Add a read-aside cache
Our latencies when hitting DynamoDB every time aren’t bad, but they could be better. To improve them, we will be using Momento to introduce a read-aside cache.
What is a read-aside cache?
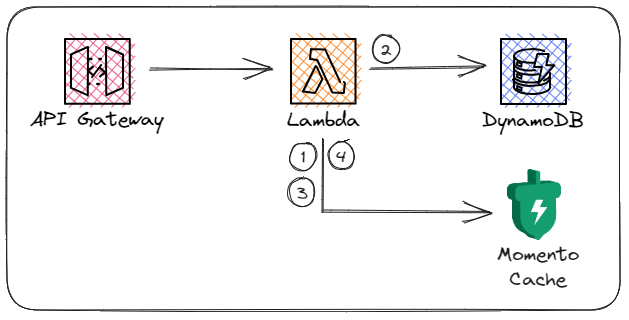
A read-aside cache is a caching strategy that stores data from a database lookup in a cache after fetching it the first time. From a component/data flow perspective, it looks like the outline below.

When data is fetched, it goes through these steps:
- Check the cache for the requested data
- If it is not in the cache, fetch it from the database
- Put the data from the database into the cache and return
- On a subsequent request for the same data, look in the cache
- Return the cached data, skipping the request to the database
Code changes
We need to update three Lambda functions in the momento-pizza-app repository:
- get-all-orders
- get-my-orders
- get-order
Each of these functions lives in the ./api/functions directory. We will be making a similar change to each of them to implement the read-aside cache. Let’s walk through updating the get-all-orders function.
To start, be sure to navigate to the ./api/functions/get-all-orders directory in a terminal in Cloud9 or your code editor. For reference, we will be updating the index.js file.
Read through the code from top to bottom - read the comments to become familiar with the flow of the functions and actions taken. You’ll notice that there are some comments which direct you to uncomment certain lines to enable caching. Go ahead and uncomment those lines as noted, and save out your changes. The code is already initializing Momento and Secrets Manager - the changes you’re making are simply adding the initial cache check, and adding the write back of the database read to the cache when there is a cache miss. You should find yourself uncommenting five lines in this file.
Your turn!
Now that we’ve taken care of updating our get-all-orders function, go ahead and make similar updates to the index.js file for the get-my-orders and get-order functions. The code for these is very similar, and you’ll need to uncomment between some clearly marked lines in each (you can search for “enable” to find them faster). Be sure to save out your work in each of these files when you are done editing!
Deploy your updated code with caching enabled
Change back to the ./api directory, and push your updates to production!
sam build --parallel
sam deploy
NOTE - The above commands will deploy to the default profile configured via the AWS CLI. If you wish to deploy with a specific profile, you can use the following commands.
sam build --parallel
sam deploy --profile <profilename>
Referring to our earlier start load generator instructions, start another round of load generation - when it is complete, we’ll be able to take a look at the difference that caching has made.